WordPress users usually come across errors in uploading files. The ‘Upload: Failed to write file to disk’ is one of the common errors in WordPress. And though it might not seem that big of an issue for WordPress professionals, the beginners might feel stuck while facing this error. To help you guide through fixing the ‘Upload: Failed to write file to disk error in WordPress, we are providing the easiest and the best of the probable solutions for this type of error.
Causes of the “Upload: Failed to Write File to Disk” Error in WordPress:
Incorrect folder permissions are one of the most probable reason that can lead to failure in writing file to a disk. Each file stored on a website has permissions associated with it, to keep a check on its accessibility and to enhance security. Incorrect file permission can result in causing an error. Sometimes, the modifications made by your WordPress hosting company in the server settings result in changing the file permissions as well. This can then become a cause for restricting you from creating or adding new files to a particular folder.
Error messages:
- Error message 1: WordPress failed to write to the disk
- Error message 2: WordPress has failed to upload due to an error failed to write a file to the disk
- Error message 3: Unable to create directory wp-content/uploads/2022/06. Is its parent directory writable by the server?
Resolving the “Upload: failed to write file to disk” Error in WordPress:
- Use an FTP client to connect to your website.
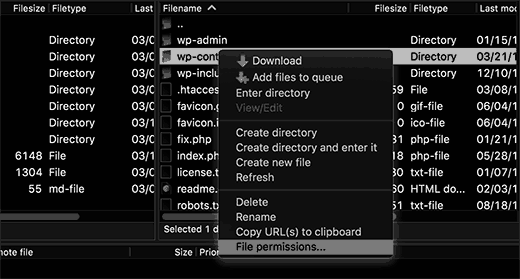
- Right-click on the wp-content folder.
- Select file permissions.

- The file permissions dialog box will appear.
- Here, you can check for the file permissions for your owner, group, and public.
- Enter 755 in the numeric value field.
- Check the box next to ‘Recurse into subdirectories.’
- Now, click on the ‘Apply to directories only’ option.
- Click on the OK button.
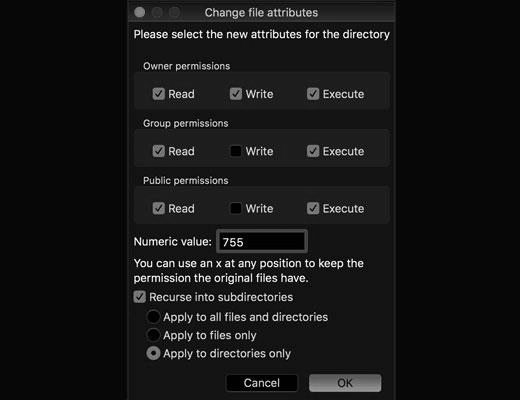
- The folder permissions will now be set to 755.
- Apply it to all sub-folders of the wp-content folder.
- The uploads folder is also a sub-folder of the wp-content folder.
- Next, you need to ensure that file permissions for the files in your wp-content folder are accurate.
- Right-click on the wp-content folder.
- Select file permissions.
- Change permissions for files.
- Enter 644 in the numeric value.
- Check the box next to ‘Recurse into subdirectories.’
- Click on the ‘Apply to files only’ option.
- Click on the OK button.
- Your file permissions is now set to 644 for all the individual files in wp-content.
- Go to your your WordPress website .
- Now, try uploading files again.
- If you are able to upload the files, you have successfully resolved the error.
- Contact your WordPress hosting provider, if the error still persists.
- Ask your WordPress hosting provider to empty the temporary files directory.
- This directory is where WordPress first uploads your images on your web server, before uploading the images to your WordPress uploads folder.
- When this directory is clear, the chances of it being full or poorly configured will not exist.
- And you will be able to upload the file to disk.