Crop, rotate, scale and flip are the basic image editing that is required by the most. And thus, WordPress have support for these too. One can crop, rotate, scale and flip an image in the WordPress admin area. In this article, we will show you how to move ahead with image cropping, rotating, scaling image sizes, and flipping them vertically or horizontally in WordPress. Having said that, let us study WordPress functionalities as a basic image editor.
Basic Image Editing in WordPress:
To crop, rotate, scale and flip an image in the WordPress admin area, you can follow the below steps.
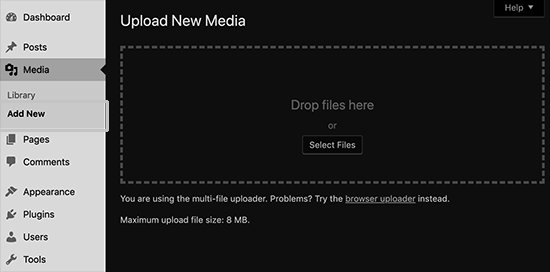
- Upload your image to WordPress.
- For this, you have two choices,
- Upload an image via the post editor.
- Visit the Media » Add New page.
- After uploading, go to the Media » Library page.
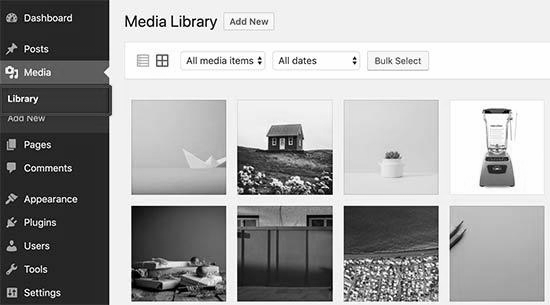
- Look for the image you uploaded.
- Click on the image.
- The image will open in a popup window.
- The image details will be displayed in the right column.
- The image preview will be displayed in the left column.
- Open the image with the built-in WordPress image editor.
- For this, you have two options.
First option::
- Locate the ‘Edit image’ button below the image preview.
- Click on the ‘Edit image’ button.
- The image editor will open inside the popup.
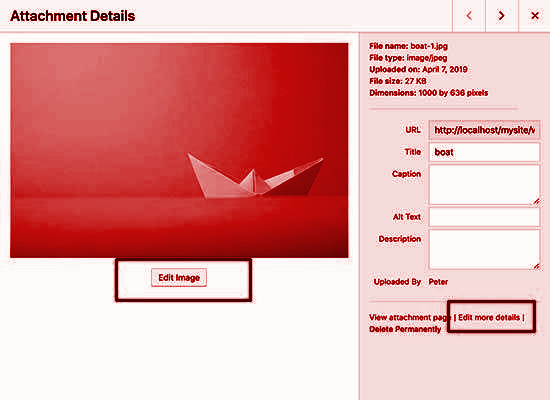
Second Option::
- Click on the ‘Edit Image Details’ link.
- The media popup will close.
- The Edit Media page will appear.
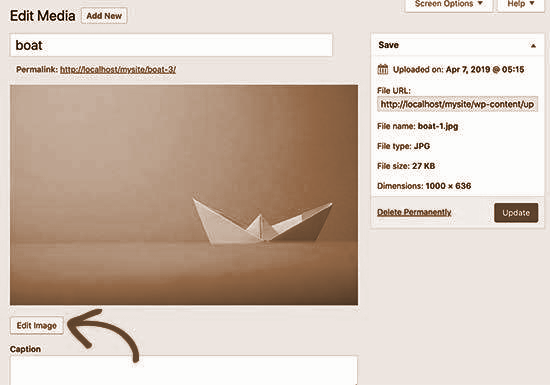
- Locate the ‘Edit Image’ button below the image preview.
- Click on the ‘Edit Image’ button
- The image editing screen will open.
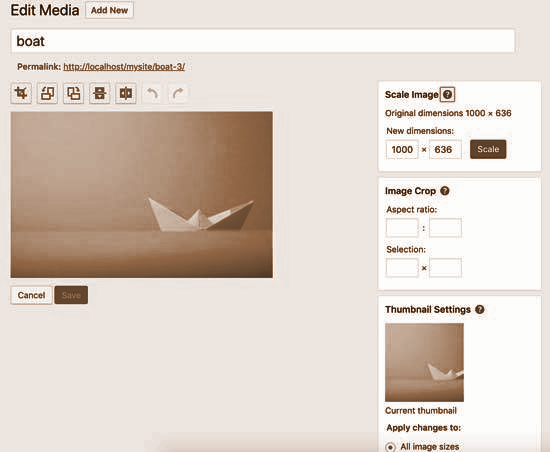
Locate the toolbar on top of the image. Each button in the toolbar serves its own purpose. We will look into each of this one by one so that you can get a clear understanding of how to use them and when to use them.
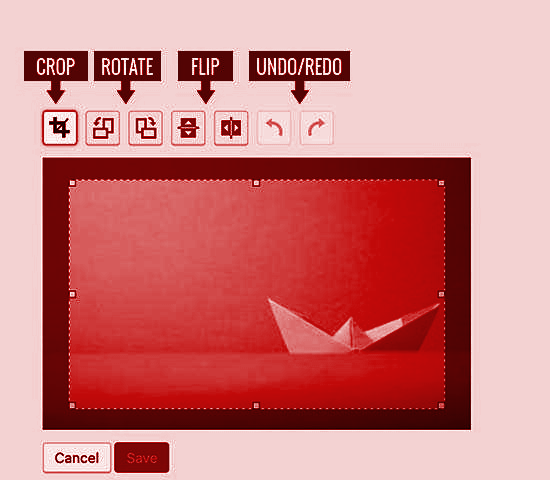
1. Crop button:
- Used to crop images.
- Click on this button.
- Select the image area to crop out of the original image.
2. Rotate buttons:
- There are two rotating buttons.
- One is used to rotate an image clockwise.
- The other is used to rotate an image anti-clockwise.
3. Flip buttons:
- There are two flip buttons.
- One is used to flip an image horizontally.
- The other is used to flip an image vertically.
4. Undo and Redo buttons:
- To undo your changes, click on the undo button.
- To revert them back, click on the redo button.
In the image edit screen, options are also available to resize the image. You can locate them in the right column. Let us look into each of these one by one so that you can get a clear understanding of how to use them and when to use them.
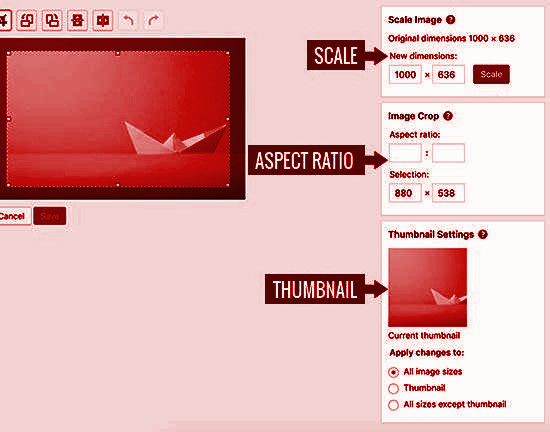
1. Scale Image:
- Use to manually scale down the image.
- It maintains the original proportions of the image.
- If used after cropping an image, the Scale Image option might not be able to keep the original proportions.
- Increasing the image dimensions is not allowed.
- You can’t make the images larger.
2. Aspect ratio:
- Used to set a certain aspect ratio.
- Using this option you can keep a certain aspect ratio intact.
3. Thumbnail settings:
- The thumbnail settings provide you with three choices.
- You can choose to apply the changes made
- To all image sizes.
- To the thumbnail only.
- To all image sizes except the thumbnail.
- For the image that you have selected earlier, the smallest image size is created by WordPress and is displayed as the current thumbnail. A beginner should not get confused between this thumbnail and the post thumbnail or featured image. They are completely different things.
- After making all the necessary changes, click on the Save, Scale, or Update button.
- The changes made will thus be saved.
- The changes will be applied to the image.
- A new copy of the image will thus be created by WordPress on the server.
Restoring Original Image After Editing:
To revert back the edited image to the original version, you can follow the below steps:
- Edit the image again.
- A new meta box labelled as ‘Restore original image’ will appear.
- Click on it.
- Click on the ‘Restore image’ button.
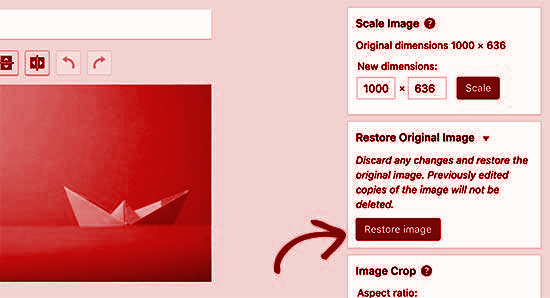
- The original image will be restored.
- Edit the image again if you want to.
- You can also leave the original image as it is.
We hope that you successfully learnt how to crop, scale, flip and rotate your images with WordPress. We also hope that you got some help with the solution presented for restoring the original image in WordPress. You can also check our other articles on image handling in WordPress websites.