A need to import external images in WordPress usually arises when you move a website from one platform to another. We are here to help you import these external images into WordPress. Before moving ahead with the methods and techniques to import external images in WordPress, we will try to understand why and in what conditions we need to import external images.
The Need to Import External Images:
Images are used to make a website more attractive and expressive to the users. These images are termed external images if they load from another website or URL. This means that these images though added to your posts or pages, they, however, are not loading from your main site.
External images become a problem in WordPress when a user migrate his or her website. The source platform could be Blogger, Weebly, Joomla, etc.
WordPress importers can be used to import images. If this is the case for you,
- Go to your WordPress admin area.
- Go to the Media » Library page.
- There you will find your imported images.
- Update URLs using Velvet Blues Update URLs plugin, if the post URL is linking to the old source.
In the above case, you don’t need any other method or technique anymore. The other scenario could be that you are not able to find the images imported to your WordPress media library. Now you need to import your external images using another technique. To know more about this, you can move ahead with the article.
Importing External Images in WordPress using Auto Upload Images plugin:
To import your external images in WordPress using the Auto Upload Images plugin, you can follow the below steps.
- Install the Auto Upload Images plugin.
- Activate the Auto Upload Images plugin
- Go to the Settings » Auto Upload Images page.
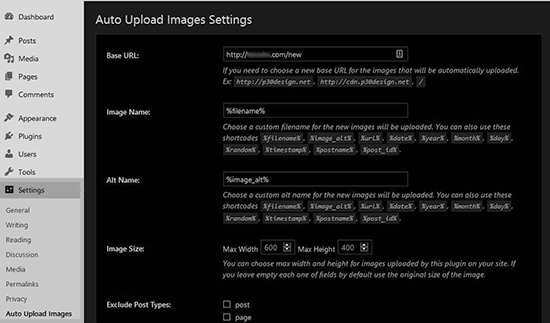
- Review the plugin settings.
- Change the settings if required.
- By default, the images will be imported to the WordPress media uploads folder.
- Add a different base URL, if required.
- Likewise, set filename, image alt tag, image size, and exclude post types if required.
- Click on the Save Changes button.
- The changes made will be successfully saved.
- Now, update all posts with external images.
- Go to the Posts » All Posts page.
- Locate the Screen Options button at the top.
- Click on the Screen Options button.
- Go to the Number of items per page field.
- Increase the number to 999.
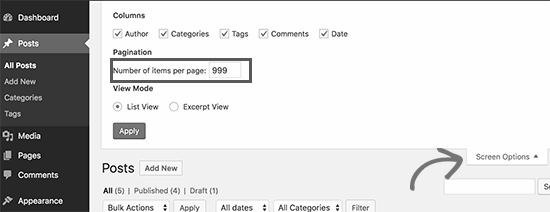
- Click on the Apply button.
- The page will be reloaded.
- WordPress will, thus, show 999 posts at a time.
- Select all your posts.
- Select Edit under the bulk actions menu.
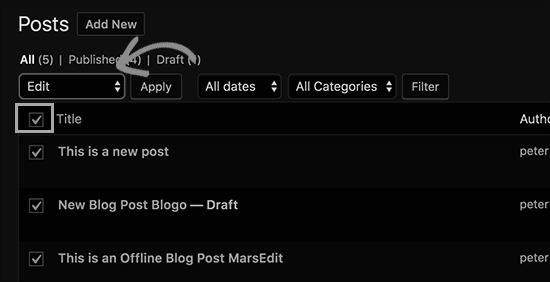
- Click on the Apply button.
- A quick edit box will appear with all selected posts.
- Don’t change any of the settings in the bulk edit settings.
- Click on the Update button.
- The plugin will check all selected posts.
- On finding external images, it will import them.
- All your posts are thus updated successfully.
- If the number of posts is more than 999, go to the next page.
- Select the remaining posts.
In this article, we tried to help you with importing external images in WordPress. There could be other image issues that you might be facing in WordPress. It is also possible that you would be wanting to add some unique features to your WordPress website. Whatever is the case, If you want to learn more about WordPress and its features, you can always check our articles. We are trying to cover most of the common and troublesome issues in WordPress that you might face or might be facing. Often, the issue seems easier to solve, when you refer to a guide for it. We understand this, and thus, we are always trying to provide you with the easiest solutions.