In this article, we will look at how to fix WordPress not sending email problems. The actual problem could be that either the contact form plugin is not sending emails, or you are not able to see any WordPress notifications. The main goal here is to ensure that the emails are being sent without any problems. We also need to avoid the spam folder.
Not Getting Emails from Your WordPress Site:
The most common reason for this error in WordPress might be that the WordPress hosting server itself is not properly configured to use the PHP mail() function. In any other case, the error may be caused because of the reduction of email spam by the tools used by your email service providers like Gmail. These tools are designed to detect and ensure the location of the sender of an email.
On detecting the emails sent by WordPress websites, the tools of the email service providers often fail the test for WordPress. In other words, the emails sent by WordPress websites might not make an easy way to our spam folder and let alone inbox.
Sending the email newsletter by using WordPress is not at all recommended.
Simple Mail Transfer Protocol:
Simple Mail Transfer Protocol or SMTP is recommended to be used for sending emails in WordPress. It is the business standard for sending emails that apply decent authentication which directs to high email deliverability.
Unlike the PHP mail() function, WordPress sites can use SMTP to send emails efficiently. It uses a WP Mail SMTP plugin for the configuration. You can thus connect to the services offered by SMTP. SMTP services include but are certainly not limited to Gmail (G Suite), Amazon SES, Office365, SendinBlue, etc.
Installation of the WP Mail SMTP Plugin:
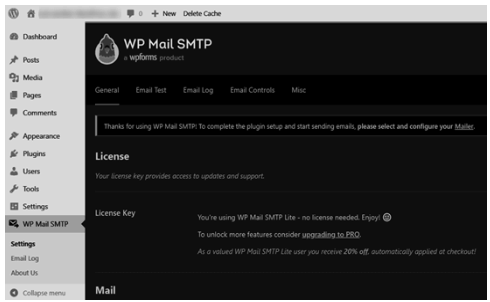
To use the SMTP services on WordPress, you first need to install the WP Mail SMTP plugin on your WordPress Website. After installing the WP Mail SMTP plugin, activate it. The next step in this process includes the configuration of the plugin settings. For this, start with clicking on WP Mail SMTP in your WordPress dashboard.
Now, enter your name and your business email address. Make sure that the email address you are entering here is the one that you want your site’s emails to come from. This email address should be the one that will be used for the SMTP mailing service.
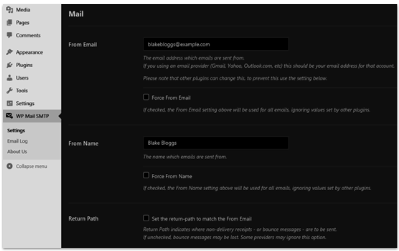
If the settings for the other plugins vary, then on using the above-entered name and email address, the settings of the other plugins will be overridden by the WP Mail SMTP. Now, you can make a choice for the SMTP mailing service you want for your website.
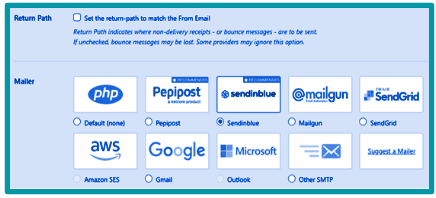
For instance, if you want to set up the SMTP using Sendinblue, then the first and foremost step will be to create an account with Sendinblue. Let’s understand setting up the SMTP using Sendinblue in more detail.
Sending WordPress Emails using Sendinblue:
When we say sending emails, it means emails sent through your WordPress site. This might include the new user account details, email sent from your contact form, password recovery emails, etc. As an email service provider, Sendinblue allows its users to send a large number of emails. The deliverability offered is also high. If you are looking for free emails, then also Sendinblue can be a good choice as it offers to send up to 300 emails per day for free. When we are concerned with large websites, this number might seem too low. However, for small websites, this count of free emails is more than enough.
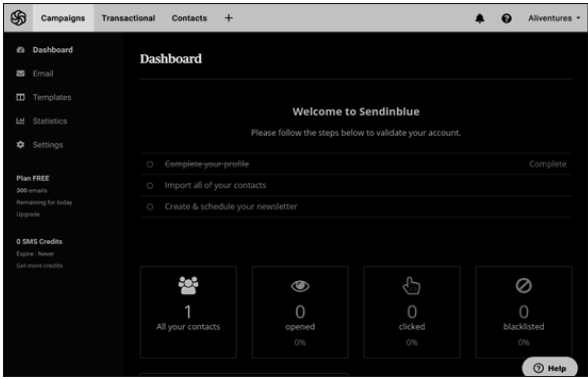
Start with creating an account on the Sendinblue website by clicking on the ‘Sign up free’ button. The Sendinblue dashboard will then become visible to you. You can complete your profile either on creating the account or after creating it. We will now see the next step in the process of sending emails through Sendinblue.
Setting Up a Subdomain for Your Website:
Set up a subdomain. For this, you can follow the below steps, thus, creating a separate section of the site.
- Log in to your web hosting account.
- In your control panel, look for the Domains section.
- You can follow the instructions for the respective hosting companies. Similarly, you can create a subdomain if your DNS is managed at a domain registrar like GoDaddy.
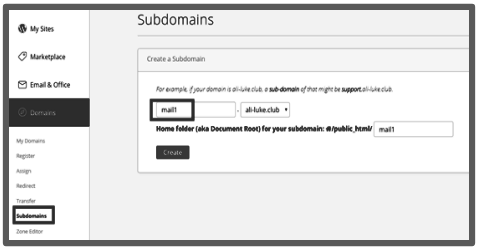
Example: Hosting account on Bluehost:
- Log in to your web hosting account.
- Go to Domains.
- Go to Subdomains.
- Type in your subdomain. For instance, you can use mail123.yourdomain.com.
- Click ‘Create’.
Now, add the created subdomain to your Sendinblue account.
Adding the Subdomain to your Sendinblue account:
- Log in to your Sendinblue account.
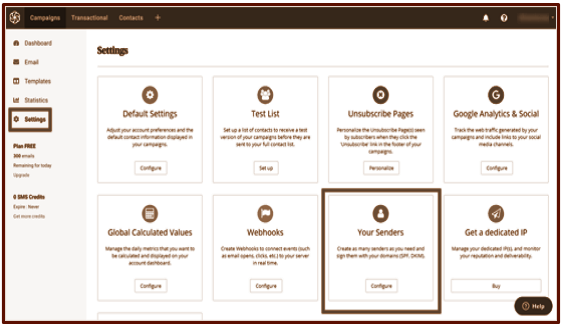
- Go to ‘Settings’.
- Go to the ‘Your Senders’ option.
- Click on the ‘Configure’ button.
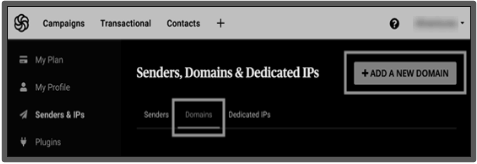
- Click on the ‘Domains’ tab.
- Click the ‘Add a New Domain’ button.
- Enter your subdomain.
- Check the box next to “I would like to use this domain name to digitally sign my emails (SPF, DKIM, DMARC)”.
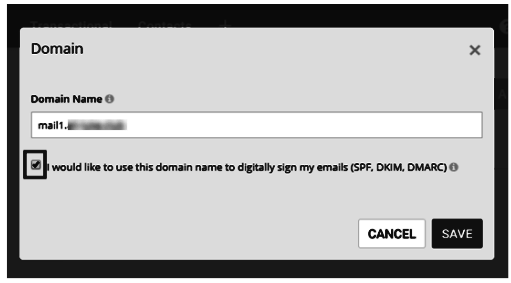
- Click on the ‘Save’ button.
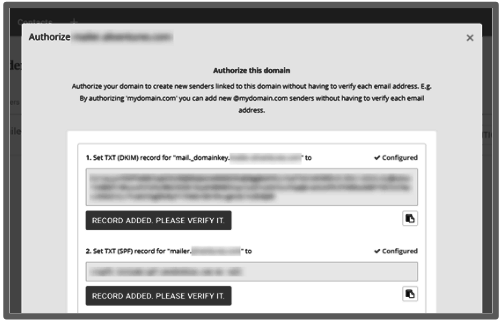
- A popup will rise containing the several DNS records listed.
Your domain name is now authorized with Sendinblue.
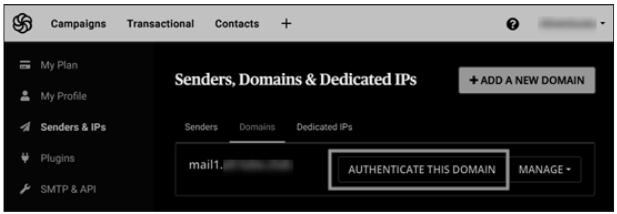
- In case, the popup is closed, click on the ‘Authenticate This Domain’ button.
- The button can be found next to the subdomain.
- In the next step, you will have to open up a new browser tab.
- Log in to your web hosting account.
- Look for your domain.
- Lastly, open up the DNS records.
If you are working with Bluehost, you can follow the below steps:
- Go to Domains » My Domains.
- Click on the ‘Manage’ button. You can find it next to your domain.
- Before moving ahead with these steps, you must have got TXT records from Sendinblue.
- Add three of the TXT records, here.
- Scroll down and search for the TXT section of your DNS records.
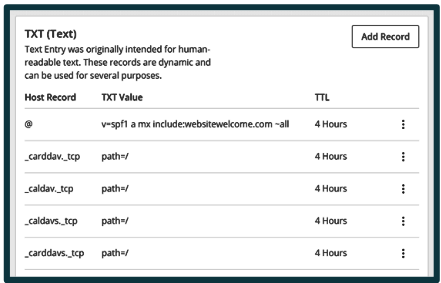
- Click on the ‘Add Record’ button.
- Complete the first record.
- Host Record/Host/Name: mail._domainkey.mail123
- Record Type: TXT
- TXT Value/TXT Data: Copy from Sendinblue.
- TTL: 1 day
- Here, add your subdomain, in the place of mail123.
- In the Sendinblue details, the first, long piece of code that we come across represents the TXT Value or TXT Data.
- TTL could be 1 Day, 24 hours or 86400 seconds.
- For GoDaddy, TTL is set as 1 hour.
- Click on the ‘Save’ button to complete the process of adding the first record.
Similarly, move ahead with the second record.
-
- Host Record: mail123
- Record Type: TXT
- TXT Value: v=spf1 include:spf.sendinblue.com mx ~all
- TTL: 1 day
- Click on the ‘Save’ button to complete the process of adding the second record.
Lastly, complete the third record.
-
- Host Record: mail123
- Record Type: TXT
- TXT Value: Copy from Sendinblue (the third piece of code)
- TTL: 1 day
- Click on the ‘Save’ button to complete the process of adding the third record.
The fourth piece of code in Sendinblue represents a DMARC record, and it is recommended to be used only by individuals experienced with DMARC configuration.
After adding the records, follow the below steps:
- Go back to Sendinblue.
- Click the “Record Added. Please Verify It” button for each record.
- The verification might take 24-48 hours or less than that.
- After the verification is done, the word ‘Configured’ will appear in green colour, next to the records.
Concluding Setting Up WP Mail SMTP to Use Sendinblue:
- Go to your WordPress dashboard.
- Go to WP Mail SMTP settings.
- Enter the “From Email” and “From Name”, if not done yet.
- The ‘Return Path’ checkbox should be left unchecked.
- Click on ‘Sendinblue’.

- Go to your Sendinblue account.
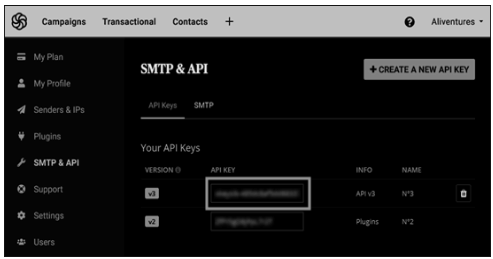
- Look for your API key.
- Click on the link below the ‘API Key’ box.
- The Sendinblue account dashboard will open in a new tab.
- From this page, you need to copy the v3 API key.
- Now everything is set up.
- Send a test email to verify that all is perfect.
- In the WP Mail SMTP, go to the ‘Email Test’ tab.
- Enter the recipient’s email address. (Default:: site’s admin email).
- Click on the ‘Send Email’ button.
- A message will appear ‘Test HTML email was sent successfully!’
- Verify it by checking your inbox for the email.
- In other cases, you will receive the message: [permission_denied]: Unable to send the email. Your SMTP account is not yet activated, which means that your Sendinblue account is not yet activated.
Alternative Ways to Fixing WordPress Email Issue
Instead of Sendinblue, you can also choose to use Office 365, Gmail / G Suite, Amazon SES, etc.
Gmail or G Suite with WP Mail SMTP to Fix WordPress Emails:
Having a Gmail or G Suite account means that they can also be used for serving the purpose of sending emails. Better email deliverability is facilitated by G Suite than a Gmail account.
To use Gmail or G Suite, you can follow the below steps:
- Set up WP Mail SMTP
- Click on the ‘Google’ option.
- Check the ‘Return Path’ box.
- Enter the ‘Client ID’ and ‘Client Secret’ details.
(To get these details, first, create a web application in your Google account).
Limitations:
- Contacting your web host might be an added step to get the whole thing working. Your web host might be the one who can install the right certificate.
- Changing the email address means a completely new setup process and creating a new web application, again.
Office 365 / Outlook with WP Mail SMTP to Fix WordPress Emails:
- Set up WP Mail SMTP.
- Click on the ‘Other SMTP’ option.
- A form will open.
- Fill the form.
- SMTP Host: smtp.office365.com
- Encryption: TLS
- SMTP Port: 587
- Auto TLS: (leave switched on)
- Authentication: (leave switched on)
- SMTP Username: Office 365 account email address
- SMTP Password: Office 365 account password
Limitations:
The password is stored in plain text within WordPress and is thus not secure. If there are multiple administrators on your account, the password will be visible to all. However, you can store your password in your wp-config.php file instead, by following the instructions in the WP Mail SMTP app.
Amazon SES with WP Mail SMTP to Fix WordPress Emails:
- Amazon AWS platform has a Simple Email Service (SES).
- It can let you send up to 62,000 emails every month for free.
- The setup is, however, a little extra challenging for amateur users.
- To set up Amazon SES with WordPress, you can go through its step-by-step process.