General Settings in WordPress
The General Settings in WordPress permit you to set totally different general choices for the WordPress website. To assemble these general settings in WordPress, click the “Settings” button in the Navigation Bar of the WordPress Admin Panel to show the “General Settings” page to the right. This page contains options for changing the overall settings in WordPress for your entire website. The fields on this screen additionally confirm a number of the fundamentals of your website setup.
Enter the name for your web site into the “Site Title” field. Most themes show the site title at the top of each page, within the title bar of the browser, and because of the distinguishing name for syndicated fields.
Type the positioning tagline, or website slogan, into the “Tagline” field. This line can seem after the title. Most themes show the tagline. This should be short and brief and provides a general idea of what your web site is about.
The “WordPress Address (URL),” “Site Address (URL),” and “E-mail Address” fields should already be found out, as this is often info that’s needed to line up WordPress. You’ll in all probability not need to modify these settings. The URL fields are most frequently constant; however, you can change the “Site Address (URL),” if required. The positioning address is different if you wish the site homepage to show a discrepancy from the directory into which you installed WordPress. The “E-mail Address” field is that the default e-mail address to use for body functions on the site.
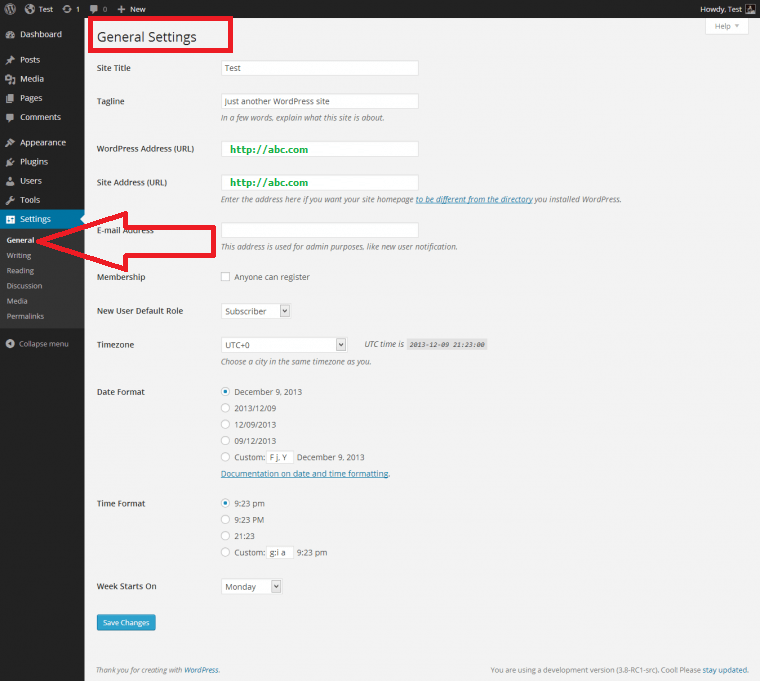
General Settings in WordPress- Tutorial: an image of a number of the settings shown among the “General” settings category in WordPress 4.0.
To allow web site guests to register themselves as users on your site, check the “Anyone can register” checkbox next to the “Membership” label. Then use the “New User Default Role” drop-down to pick the default role to assign to new users once they register as members on the site. Select either “Subscriber,” “Contributor,” “Author,” “Editor,” or “Administrator.”
You can opt for a geographical zone for your web site by selecting one from the “Time zone” drop-down. UTC means “Coordinated universal time.” Use the “UTC Time zone” drop-down to decide on a town that’s within the same geographical zone as you. to decide on a date format for your web site, choose the specified choice button choice within the “Date Format” section. To decide on a time format for your web site, choose associate choice button choice within the “Time Format” section. Finally, use the “Week Starts On” drop-down to select on which day the week starts.
After you have got finished dynamic your general settings in WordPress, click the “Save changes” button at the bottom of the “General Settings” page to save lots of your general settings in WordPress.
General Settings in WordPress Directions:
- Click the “Settings” button within the Navigation Bar of the WordPress Admin Panel to show the “General Settings” page to the right.
- Enter the name for your web site into the “Site Title” field.
- Enter the site tagline, or web site slogan, into the “Tagline” field.
- The “WordPress Address (URL),” “Site Address (URL),” and “E-mail Address” fields should already be created, as this is info that’s needed to line up WordPress. You’ll most likely not got to amendment these settings.
- The URL fields are most frequently a similar; however, you’ll amendment the “Site Address (URL),” if required. The site address can be different if you would like the site homepage to be different from the directory into that you put in WordPress.
- The “E-mail Address” field is the default e-mail address to use for body functions on the site.
- To permit web site guests to register themselves as users on your site, check the “Anyone will register” checkbox next to the “Membership” label.
- Then use the “New User Default Role” drop-down to select the default role to assign to new users once they register as members on the site.
- To select a geographical zone for your web site, use the “UTC Time zone” drop-down to select a town that’s within the same geographical zone as you.
- To select a date format for your web site, choose the desired choice button choice within the “Date Format” section.
- To select a time format for your web site, choose associate degree choice button choice within the “Time Format” section.
- Use the “Week Starts On” drop-down to select on which day the week starts.
- When you have finished changing your general settings in WordPress, click the “Save changes” button at the bottom of the “General Settings” page to save your general settings in WordPress.